Table of Contents
LIVE tuning
Description
The LIVE tuning feature allows real time calibration changes to the ECU while the engine is running.
It works by monitoring a file on the file system for changes and synchronizing these changes to the ECU.
This means that it works with any editor and does not require A2L or any other additional files.
Supported ECUs
Almost all Bosch MED17, EDC17, MG1 and MD1 ECU's used by most manufacturers can be supported.
Because adding support for different makes is somewhat time consuming, support is added on an on-demand basis.
Master & Slave systems are supported through the VehiCAL Muxer.
Multivariant files are automatically detected, and the currently selected variant worked on.
Send an e-mail to support@vehical.net with a full read of your ECU if you want it to be added.
Keep in mind that an Advanced Logging protocol must already exist for the ECU.
How it works
You simply choose a file for the tool to monitor on the hard drive and as soon as any changes are made to the file they get instantly uploaded to the ECU. The initial synchronization takes about 10 seconds, after that all calibration changes are loaded to the ECU in <1 second.
You can export the file with WinOLS or any other editor and overwrite the monitored file, the changes will be loaded to the ECU instantly.
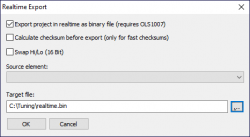
If you have the OLS1007 simulators module, you can use the “realtime export” feature, so the changes are loaded as soon as you change the map in WinOLS - then you do not have to export the file every time.
Limitations
- These changes are non-permanent. If you cycle the ignition, they are lost. The tool detects this and stops monitoring. You can then restart monitoring and it will synchronize all your changes at once, so you can continue working immediately if you made a small break or cooled the car down.
- The ECU has a limited amount of CALRAM. This means that if you try to change too many different modules, then you might receive an out of memory error. If this happens, simply flash the latest version to the ECU, and then continue LIVE tuning with this version.
- Changing the function monitoring area (MoF, MoX modules) with this method will result in an immediate ECU reset due to incorrect checksum. Version 2.0.4 introduced automatic detection of monitoring area checksum ranges and prevents modifications to them.
Instructions
- Init the ECU and buy a LIVE license, using the
Buy Licensebutton. - Patch the ECU, please refer to the Patching ECU page.
- Init the ECU again, and the LIVE
Configurationbutton should be available. - After configuring, connect to the ECU, and the
Start LIVEbutton will become available, press it to start monitoring the file.- Syncing stage: during start, the tool will take ~10 seconds for syncing. This is required because it must checksum all maps in the ECU and make sure that the file in the ECU and the monitored file are the same. At the end of the check all found differences will be pushed to the ECU.
- Monitoring stage: After syncing is complete, the tool enters monitoring mode. In monitoring mode any changes you make to the monitored file are pushed to the ECU instantly.
- Make modifications to the monitored file. You can simply overwrite it any way you want, but you should not delete or rename it, otherwise the LIVE Monitoring will stop and you will have to restart it.
LIVE Configuration
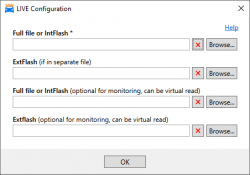
The LIVE configuration has a number of files you can select.
- ExtFlash - some ECUs have maps in external flash. Required for those tools that place the ExtFlash in a separate file when reading.
- Full file or IntFlash for monitoring - optional, if specified, then this file will be monitored for changes instead of the first file. Useful for tools that have a different format for OBD and Bench/BOOT format, so that you can make changes to the OBD file. The only requirement is that the maps are at the same offset as in the file specified above.
- ExtFlash for monitoring - optional, if specified, then this file will be monitored for changes instead of the ExtFlash above.
Only the first file is required for the tool to work. If you select an incorrect file, the tool will detect this and warn you.
WinOLS integration
If you have the OLS1007 “Simulators” plugin, you can avoid the need for exporting the file every time. All OLS300 users have this plugin.
- Select the output file and configure as image on the right (Export on, Checksum off, Swap off). Configure VehiCAL Logger to monitor the output file.
Now you will be able to make a change in a map or the hexdump, and the change will be immediately pushed to the ECU.
Troubleshooting
- If your device drops packets in the log with the LIVE patch, try increasing the
STminparameter inOptionsor connecting through VehiCAL Muxer in parallel mode. - The logging speed can be 20-30% lower on some control units when patched with LIVE. This is because a different method has to be used for logging.
Pricing
- Standard users need to have an Advanced Logging license. The LIVE functionality costs an additional 5 credits.
- PRO users also need to have an Advanced Logging license. The LIVE functionality is free of charge in standalone client.
- PRO users have an additional paid option to use LIVE remotely with encrypted containers.


