Table of Contents
Getting started
Requirements
- PC with Windows 7 SP1 or newer.
- J2534 compatible interface cable or Ethernet cable. E.g. Tactrix OpenPort or BMW ENET cable. Refer to the Tested devices list.
- Internet connection during the initialization and patching phases only.
Installation
- Run the installer and install the program.
- If the installer prompts - install the .NET runtime. Make sure you install the x86 desktop version.
- Start the tool via the shortcut in the Start Menu, or directly via the .exe file.
- Register at https://billing.vehical.net and get your API Key
Windows 7
Windows 7 is EOL and unsupported since January 2020. This means that updates are no longer available to download from Microsoft. You should ideally move to a supported OS as soon as possible.
If after installing SP1 and the .NET runtime the tool still does not run, two updates are required:
Basic Usage
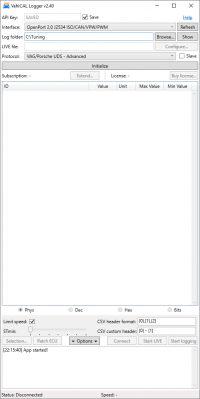
- Enter the API key into the “API Key” box, the “Save” checkbox will save the key in encrypted form. Do not share your key with anyone, if the system detects this, the account will be automatically locked out.
- Select your J2534 interface from the list.
- Select a protocol
- Connect your J2534 interface to the car, turn the ignition on, press
Initialize.
At this point the tool will connect to the server. For some protocols you might be asked to provide the original file. If your ECU is supported, the tool will load the list of parameters that can be logged from the server and display the selection.
Some protocols require the ECU to be patched. The relevant information will be displayed in the box at the bottom of the tool.
Licensing
The licensing status is displayed in the main window after initialization. A license is not needed to see if the logger is compatible with the ECU. You should always check compatibility before purchasing credits (make a successful init). Also check the parameter list and make sure that you are satisfied with the available parameters.
Before you can log, patch or LIVE tune you first need a license:
- Basic protocols require a single monthly subscription to be active. Click the
Extend…button to extend the subscription for credits. - Advanced protocols require a per VIN license. For buying the license an active subscription is required, but the protocol will continue working even after the subscription expires. If you do not have an active subscription, click the
Extend…button to extend the subscription for credits. Finally, click theBuy Licensebutton to buy a license for credits. - LIVE tuning licenses can only be bought together with an Advanced protocol license or if you buy only the Advanced license and wish to add the LIVE later you can pay the difference.
Credits can be added at https://billing.vehical.net
NB! The license is considered per-seat. You can not use the key on more than one computer at the same time. Do not share your key outside of a single location of your company. This will be detected and the account locked out. For companies with multiple dealers there is a Pro version.
Measurement Selection
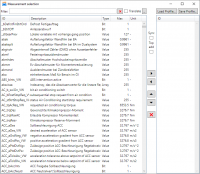
The measurement selection window is automatically shown after initialization. If closed, it can be opened at any time using the Selection… button.
- The up and down arrows can be used to reorder the added items.
- Type text into the filter to filter the list in real time. If you want to match only the beginning of an ID use ^ at the start of the search term (e.g. ^lamb). The red cross at the end of the input clears the filter.
- The
Save profilebutton saves the current selection to file. - The
Load profilebutton loads a selection from file. Only the variables that are available will be loaded, the rest will be ignored. - The
Synccheckbox makes the measurement list follow the selected item in the selection box. It is useful if you want to look up the description of a measurement. - Checking the
Top addcheckbox makes the tool insert new values on top of the list. - You can use the
Translatecheckbox to translate all descriptions to English in one click.
Streaming ECU data
To view data on-screen only, press the Connect button. It is possible to add and remove measurements while the datastream is active, making it easier to find what you need.
The data display can be changed using the radio buttons, if you need to see raw unconverted data from the ECU.
Logging
Make sure you have selected a Log folder in the settings on top.
Press the Start Logging button to start writing the stream to file, press it again to stop. The output is a CSV file with comma as the separator.
Alternatively use the Ctrl + Shift key combination to start and stop logging.
Press Show to open an explorer window pointing to the log folder.
Options
See: Advanced Options
Connecting to multiple control units
It is possible to log multiple control modules simultaneously in Master/Slave systems and in vehicles that have protocols for both the engine and transmission. Refer to the VehiCAL Muxer page for more details.
LIVE tuning
Please refer to the LIVE tuning page.

